參考網頁來自 adobe support community
只要下載更新升級到 11.0.23 版本就能暫時解決這問題 , 但不知道會不會隨著WIN10的下次更新又會使 ADOBE ACROBAT XI 失效
參考網頁來自 adobe support community
只要下載更新升級到 11.0.23 版本就能暫時解決這問題 , 但不知道會不會隨著WIN10的下次更新又會使 ADOBE ACROBAT XI 失效
以下內容節錄自 IT 之家 URL : https://www.ithome.com/0/484/097.htm
OpenSSL 项目发布安全公告称存在一个影响 OpenSSL 1.1.1d, 1.1.1e 和 1.1.1f 的高危漏洞 (CVE-2020-1967),该漏洞可被用于发起 DoS 攻击。
根据官方对该漏洞的描述,在 TLS 1.3 握手期间或握手之后调用 SSL_check_chain() 函数的服务器或客户端应用可能会导致崩溃,原因是不正确处理”signature_algorithms_cert” TLS 扩展而引起的空指针引用。如果从另一方接收到一个无效或未被识别的签名算法,则会发生崩溃。这可能会被恶意攻击者利用并发起 DoS 攻击。

该漏洞由 Bernd Edlinger 通过 GCC 中的新静态分析通道 -fanalyzer 发现,并已于2020年4月7日向 OpenSSL 报告。
对于受影响的 OpenSSL 1.1.1(1.1.1d,1.1.1e 和 1.1.1f)用户,建议尽可能快地升级到 1.1.1g。OpenSSL 1.1.1d 之前的版本不受此漏洞影响。
更早的版本如 OpenSSL 1.0.2 和 1.1.0 也均未受影响,不过这些版本都不再被支持,也无法再接受更新。建议使用这些版本的用户升级至 OpenSSL 1.1.1。
以下內容轉載自 IT 之家 URL : https://www.ithome.com/0/483/457.htm
IT之家4月19日消息 Ubuntu 20.04 LTS on Windows 已经上架 Microsoft Store 应用商店,Ubuntu 20.04 on Windows允许使用Ubuntu Terminal并运行Ubuntu命令行实用程序,包括bash,ssh,git,apt等。请注意,Windows 10 S不支持运行此应用程序。
Ubuntu 20.04 LTS on Windows需要Windows 10 版本 16215.0 或更高版本,支持ARM64、x64体系结构。

据IT之家了解,要启动Ubuntu 20.04 on Windows,请在命令行提示符(cmd.exe)上使用“ ubuntu2004”,或在“开始”菜单中单击Ubuntu磁贴。
要使用此功能,首先需要使用“打开或关闭Windows功能”并选择“Windows Subsystem for Linux”,单击“确定”,重新启动,然后使用此应用程序。
也可以使用Administrator PowerShell提示符执行以上步骤:
Enable-WindowsOptionalFeature -Online -FeatureName Microsoft-Windows-Subsystem-Linux
这个应用会在Windows Subsystem for Linux上安装Ubuntu 20.04 LTS版本。
请注意,应用程序更新不会更改Ubuntu安装。要升级到新版本,请在Ubuntu Terminal终端中运行do-release-upgrade。
其實申請 Let’s Encrypt certificate 有很多方法,
有很多 API 總有一款能配給到你系統的配置
https://letsencrypt.org/zh-tw/docs/client-options/
我自己就用 Linux bash shell : acme.sh &
certbot client 來申請 SSL 証書
參考網站 :
今次我要試的是 DOCKER , 點解要試這個 ? 因為有公司舊的網頁要用 PHP 5.x 同時又要 PHP 7.x 雖然好多方法去實現同時運行多個 PHP VERSION , 但是一個好機會試吓新東西
在文章最後有我參考過的網站文章連結
大家先去了解什麼是 DOCKER
參考網址 : https://philipzheng.gitbooks.io/docker_practice/content/
好了大家了解都差不多了 , 那我們開始吧 !
我用的是 ubuntu , 所以以下 command 都是 debian apt
| apt update apt upgrade apt install gnupg2 apt install curl apt install software-properties-common curl -fsSL https://download.docker.com/linux/ubuntu/gpg | sudo apt-key add – add-apt-repository “deb [arch=amd64] https://download.docker.com/linux/ubuntu $(cat /etc/os-release | grep UBUNTU_CODENAME | cut -d ‘=’ -f 2) stable” apt update apt install docker-ce |
好了安裝完, 立即試一試, hello-world docker 有什麼反應先
| root@docker-test:~# docker run hello-world Unable to find image ‘hello-world:latest’ locally latest: Pulling from library/hello-world 1b930d010525: Pull complete Digest: sha256:fc6a51919cfeb2e6763f62b6d9e8815acbf7cd2e476ea353743570610737b752 Status: Downloaded newer image for hello-world:latest Hello from Docker! To generate this message, Docker took the following steps: To try something more ambitious, you can run an Ubuntu container with: Share images, automate workflows, and more with a free Docker ID: For more examples and ideas, visit: root@docker-test:~# |
當你行 docker run hello-world
它會自動上到 “倉庫” 找 “hello-world” 這個影像檔然後執行
之後我們再試下 ubuntu shell 看看
docker run -it ubuntu bash
| root@docker-test:~# docker run -it ubuntu bash Unable to find image ‘ubuntu:latest’ locally latest: Pulling from library/ubuntu 423ae2b273f4: Pull complete de83a2304fa1: Pull complete f9a83bce3af0: Pull complete b6b53be908de: Pull complete Digest: sha256:04d48df82c938587820d7b6006f5071dbbffceb7ca01d2814f81857c631d44df Status: Downloaded newer image for ubuntu:latest root@7b55e3f631cd:/# |
這個 shell 是在 ubuntu image 內執行的 , “7b55e3f631cd” 就是 docker 生成的 ubuntu 容器內裏就是一個 ubuntu
| root@7b55e3f631cd:/# ls -la total 72 drwxr-xr-x 1 root root 4096 Feb 24 07:43 . drwxr-xr-x 1 root root 4096 Feb 24 07:43 .. -rwxr-xr-x 1 root root 0 Feb 24 07:43 .dockerenv drwxr-xr-x 2 root root 4096 Feb 19 01:17 bin drwxr-xr-x 2 root root 4096 Apr 24 2018 boot drwxr-xr-x 5 root root 360 Feb 24 07:43 dev drwxr-xr-x 1 root root 4096 Feb 24 07:43 etc drwxr-xr-x 2 root root 4096 Apr 24 2018 home drwxr-xr-x 8 root root 4096 May 23 2017 lib drwxr-xr-x 2 root root 4096 Feb 19 01:15 lib64 drwxr-xr-x 2 root root 4096 Feb 19 01:14 media drwxr-xr-x 2 root root 4096 Feb 19 01:14 mnt drwxr-xr-x 2 root root 4096 Feb 19 01:14 opt dr-xr-xr-x 392 nobody nogroup 0 Feb 24 07:43 proc drwx—— 2 root root 4096 Feb 19 01:17 root drwxr-xr-x 1 root root 4096 Feb 21 22:20 run drwxr-xr-x 1 root root 4096 Feb 21 22:20 sbin drwxr-xr-x 2 root root 4096 Feb 19 01:14 srv dr-xr-xr-x 13 nobody nogroup 0 Feb 20 03:34 sys drwxrwxrwt 2 root root 4096 Feb 19 01:17 tmp drwxr-xr-x 1 root root 4096 Feb 19 01:14 usr drwxr-xr-x 1 root root 4096 Feb 19 01:17 var root@7b55e3f631cd:/# |
其實概念就 docker 生成一個可讀寫的容器 , 把 image 投射內其中, 你在這個容器做的東西不會影響 image 內的資料 ,
image 是唯讀的 !
每個 docker 生成的容器都是獨立 , 容器究竟是什麼 , 如果你知道有些掃毒程式會創造 “沙盒” 來測試那些行檔是否中毒 !
沙盒的概述可以看看這些網址
https://www.arthurtoday.com/2011/06/sandbox.html
http://www.pcdiy.com.tw/detail/11605
同樣 docker 生成的容器就算被入侵 , 基本上都不會影響主機 !
我們試一試裝個 apche , 先看看有那些 image 可以用先
用command “docker search apache” 找找有什麼 image 可用
| root@docker-test:~# docker search apache NAME DESCRIPTION STARS OFFICIAL AUTOMATED httpd The Apache HTTP Server Project 2869 [OK] tomcat Apache Tomcat is an open source implementati… 2645 [OK] cassandra Apache Cassandra is an open-source distribut… 1092 [OK] maven Apache Maven is a software project managemen… 983 [OK] solr Solr is the popular, blazing-fast, open sour… 729 [OK] apache/nifi Unofficial convenience binaries and Docker i… 161 [OK] eboraas/apache-php PHP on Apache (with SSL/TLS support), built … 143 [OK] apache/zeppelin Apache Zeppelin 117 [OK] eboraas/apache Apache (with SSL/TLS support), built on Debi… 91 [OK] apache/airflow Apache Airflow 87 groovy Apache Groovy is a multi-faceted language fo… 85 [OK] nimmis/apache-php5 This is docker images of Ubuntu 14.04 LTS wi… 61 [OK] apacheignite/ignite Apache Ignite In-Memory docker image. 60 [OK] bitnami/apache Bitnami Apache Docker Image 58 [OK] linuxserver/apache An Apache container, brought to you by Linux… 25 apachepulsar/pulsar Apache Pulsar – Distributed pub/sub messagin… 22 apache/nutch Apache Nutch 21 [OK] antage/apache2-php5 Docker image for running Apache 2.x with PHP… 16 [OK] webdevops/apache Apache container 14 [OK] newdeveloper/apache-php apache-php7.2 5 lephare/apache Apache container 5 [OK] newdeveloper/apache-php-composer apache-php-composer 4 secoresearch/apache-varnish Apache+PHP+Varnish5.0 2 [OK] oberonamsterdam/apache24-fpm Default Oberon apache setup using PHP-FPM, r… 1 [OK] jelastic/apachephp An image of the Apache PHP application serve… 0 root@docker-test:~# |
有數十個 image 可用 , 有些包含 tomcat , 有些包含 php , 看看你想用那一個 !
我們就用第一個 image “httpd” , 下載這個 image 執行 “docker pull httpd”
| root@docker-test:~# docker pull httpd Using default tag: latest latest: Pulling from library/httpd bc51dd8edc1b: Pull complete dca5bc65e18f: Pull complete ccac3445152a: Pull complete 8515f2015fbc: Pull complete e35494488b8c: Pull complete Digest: sha256:b783a610e75380aa152dd855a18368ea2f3becb5129d0541e2ec8b662cbd8afb Status: Downloaded newer image for httpd:latest docker.io/library/httpd:latest root@docker-test:~# |
下載完成, 我們看看現在我們有多少個可用的 image 先 , 執行 ” docker images”
| root@docker-test:~# docker images REPOSITORY TAG IMAGE ID CREATED SIZE ubuntu latest 72300a873c2c 2 days ago 64.2MB httpd latest c562eeace183 3 weeks ago 165MB hello-world latest fce289e99eb9 13 months ago 1.84kB root@docker-test:~# |
我們已經有三個 image , 先前測試用的 “hello-world” & “ubuntu” , 還有剛下載的 “httpd”
好了急不及待, 我們來創造一個 docker 環境行 apache 吧 !
| root@docker-test:~# docker run -d –name=apache2 httpd 2d40f50299972e46392d10b9ecf8afbbe3189cace34aaadede7d1e372509b667 |
已經生成了一個基於 httpd image 的容器 “–name” 給予這個容器一個別名
當前有多少容器在運行 command : “dcoker ps -a”
| root@docker-test:~# docker ps -a CONTAINER ID IMAGE COMMAND CREATED STATUS PORTS NAMES 2d40f5029997 httpd “httpd-foreground” 13 minutes ago Up 13 minutes 80/tcp apache2 7b55e3f631cd ubuntu “bash” 58 minutes ago Exited (127) 52 minutes ago elastic_morse a8560ebcedb9 hello-world “/hello” About an hour ago Exited (0) About an hour ago distracted_dubinsky |
你們可以看到 status 只有 apache2 在背環繼續執行 , 因為我創造apache容器時加了 “-d” daemon
要停止那些容器 command : docker stop apache2
| root@docker-test:~# docker stop apache2 apache2 root@docker-test:~# docker ps -a CONTAINER ID IMAGE COMMAND CREATED STATUS PORTS NAMES 2d40f5029997 httpd “httpd-foreground” 20 minutes ago Exited (0) 5 seconds ago apache2 7b55e3f631cd ubuntu “bash” About an hour ago Exited (127) About an hour ago elastic_morse a8560ebcedb9 hello-world “/hello” About an hour ago Exited (0) About an hour ago distracted_dubinsky |
你看到 status 已經停止了 , 可以用 “docker start apache2” 或 “docker restart
apache2” 把容器重新運行
| root@docker-test:~# docker start apache2 apache2 root@docker-test:~# docker ps -a CONTAINER ID IMAGE COMMAND CREATED STATUS PORTS NAMES 2d40f5029997 httpd “httpd-foreground” 23 minutes ago Up 2 seconds 80/tcp apache2 7b55e3f631cd ubuntu “bash” About an hour ago Exited (127) About an hour ago elastic_morse a8560ebcedb9 hello-world “/hello” About an hour ago Exited (0) About an hour ago distracted_dubinsky |
如果要完全移除這個容器,先停止這個容器再執行 command : docker rm apache2
| root@docker-test:~# docker rm apache2 Error response from daemon: You cannot remove a running container 2d40f50299972e46392d10b9ecf8afbbe3189cace34aaadede7d1e372509b667. Stop the container before attempting removal or force remove root@docker-test:~# docker stop apache2 apache2 root@docker-test:~# docker rm apache2 apache2 root@docker-test:~# docker ps -a CONTAINER ID IMAGE COMMAND CREATED STATUS PORTS NAMES 7b55e3f631cd ubuntu “bash” About an hour ago Exited (127) About an hour ago elastic_morse a8560ebcedb9 hello-world “/hello” About an hour ago Exited (0) About an hour ago distracted_dubinsky root@docker-test:~# |
看到沒有已經移除了 apache2 這容器了 !
好了講了這麼多要點樣 config 這個容器內 apache config 呢?
我們先入去這個容器看看 ! 這個容器是個 linux 所以要linux shell 入去 !
參考網址 : https://www.runoob.com/docker/docker-exec-command.html
command : docker exec -it apache2 bash
就是在 apache2 容器行 bash shell
| root@docker-test:~# docker exec -it apache2 bash root@48c49e4b63a3:/usr/local/apache2# |
已經取得 apache 容器 bash shell 了
| root@48c49e4b63a3:/usr/local/apache2# ls -la total 56 drwxr-xr-x 1 www-data www-data 4096 Feb 2 00:15 . drwxr-xr-x 1 root root 4096 Feb 2 00:12 .. drwxr-xr-x 2 root root 4096 Feb 2 00:15 bin drwxr-xr-x 2 root root 4096 Feb 2 00:15 build drwxr-xr-x 2 root root 4096 Feb 2 00:15 cgi-bin drwxr-xr-x 4 root root 4096 Feb 2 00:15 conf drwxr-xr-x 3 root root 4096 Feb 2 00:15 error drwxr-xr-x 2 root root 4096 Feb 2 00:15 htdocs drwxr-xr-x 3 root root 4096 Feb 2 00:15 icons drwxr-xr-x 2 root root 4096 Feb 2 00:15 include drwxr-xr-x 1 root root 4096 Feb 24 08:55 logs drwxr-xr-x 2 root root 4096 Feb 2 00:15 modules |
這個 image 裝了 apache location 是 /usr/local/apache2 , 我們要的 apache config 就在 conf folder 內 !
直接修改這個 conf 是可以的, 但不要忘記如果容器移除了, 資料一同移除 . 那麼如何保存這些資料 ?
你可以把當前修改過的容器 , SAVE 成新的 image 使用 , 但我們今次用的是 “資料卷”
https://philipzheng.gitbooks.io/docker_practice/content/data_management/volume.html
我們現在把容器內的 apache conf folder copy 到實體機某 folder 進行修改及以資料卷的方式掛入 apache2 容器內
| root@48c49e4b63a3:/usr/local/apache2/conf# ls -la total 120 drwxr-xr-x 4 root root 4096 Feb 2 00:15 . drwxr-xr-x 1 www-data www-data 4096 Feb 2 00:15 .. drwxr-xr-x 2 root root 4096 Feb 2 00:15 extra -rw-r–r– 1 root root 20823 Feb 2 00:15 httpd.conf -rw-r–r– 1 root root 13064 Feb 2 00:15 magic -rw-r–r– 1 root root 60847 Feb 2 00:15 mime.types drwxr-xr-x 3 root root 4096 Feb 2 00:15 original root@48c49e4b63a3:/usr/local/apache2/conf# exit exit root@docker-test:~# docker cp apache2:/usr/local/apache2/conf /opt/docker-apache2-conf/ root@docker-test:~# ls -l /opt/docker-apache2-conf/conf/ extra/ httpd.conf magic mime.types original/ root@docker-test:~# ls -l /opt/docker-apache2-conf/conf/ |
把apache2容器內/usr/local/apache2/conf 抄到實體機 /opt/docker-apache2-conf/
我們先把容器停了及移除重新創造一個用資料卷的apche2容器
| root@docker-test:/opt/docker-apache2-conf# docker stop apache2 apache2 root@docker-test:/opt/docker-apache2-conf# docker rm apache2 apache2 root@docker-test:/opt/docker-apache2-conf# docker run -d –name=apache2 -v /opt/docker-apache2-conf/conf:/usr/local/apache2/conf -v /opt/docker-apache2-conf/html:/var/www httpd 52af877f4a8fbd927f3a8fea9e3568e3d8ee317f03f2a6e22f82cc083a8c670f |
解釋一下
-v /opt/docker-apache2-conf/conf:/usr/local/apache2/conf
-v /opt/docker-apache2-conf/html:/var/www
用 -v 就是資料卷的意思
主機 folder “/opt/docker-apache2-conf/conf” 投射入容器
“/usr/local/apache2/conf” folder
主機 folder “/opt/docker-apache2-conf/html” 投射入容器 “/var/www” folder
一切都OK 了 , 但問題來了 ? 如何把主機的 listing port 投射入容器
我們就要用 -p 8081:80
List containers
| root@docker-test:/opt/docker-apache2-conf# docker ps -a CONTAINER ID IMAGE COMMAND CREATED STATUS PORTS NAMES 52af877f4a8f httpd “httpd-foreground” 8 minutes ago Up 8 minutes 80/tcp apache2 7b55e3f631cd ubuntu “bash” 2 hours ago Exited (127) 2 hours ago elastic_morse a8560ebcedb9 hello-world “/hello” 2 hours ago Exited (0) 2 hours ago distracted_dubinsky root@docker-test:/opt/docker-apache2-conf# docker stop apache2 apache2 root@docker-test:/opt/docker-apache2-conf# docker rm apache2 apache2 root@docker-test:/opt/docker-apache2-conf# docker run -d –name=apache2 -p 8081:80 -v /opt/docker-apache2-conf/conf:/usr/local/apache2/conf -v /opt/docker-apache2-conf/html:/var/www httpd 0995c2a40a9be6643f67df8db6664ffae4fea7022261190f08d732d23715f0b7 root@docker-test:/opt/docker-apache2-conf# docker ps -a CONTAINER ID IMAGE COMMAND CREATED STATUS PORTS NAMES 0995c2a40a9b httpd “httpd-foreground” 30 seconds ago Up 27 seconds 0.0.0.0:8081->80/tcp apache2 7b55e3f631cd ubuntu “bash” 2 hours ago Exited (127) 2 hours ago elastic_morse a8560ebcedb9 hello-world “/hello” 2 hours ago Exited (0) 2 hours ago distracted_dubinsky root@docker-test:/opt/docker-apache2-conf# |
看到 status 主機 8081 port 投射到 容器的 80 port 了
那就是外部連接主機的port 8081 就會 容器apache2 提供服務 http://xx.xx.xx.xx:8081/
我參考過的網址
https://blog.basec.cc/index.php/archives/65/
https://github.com/acmesh-official/acme.sh/wiki/Run-acme.sh-in-docker
https://www.jianshu.com/p/ea4a00c6c21c
https://www.iszy.cc/2019/02/13/docker-acme-sh/
https://segmentfault.com/a/1190000012063374
https://blog.chengweichen.com/2015/05/docker-nginx-php-fpm-52-mysql.html
https://my.oschina.net/u/3375733/blog/1591091
https://beginor.github.io/2017/06/08/use-compose-instead-of-run.html
https://zhuanlan.zhihu.com/p/45425683
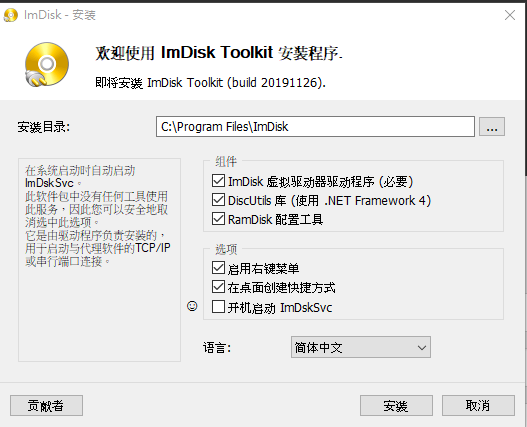
今次介紹ImDisk用來做什麼的呢?
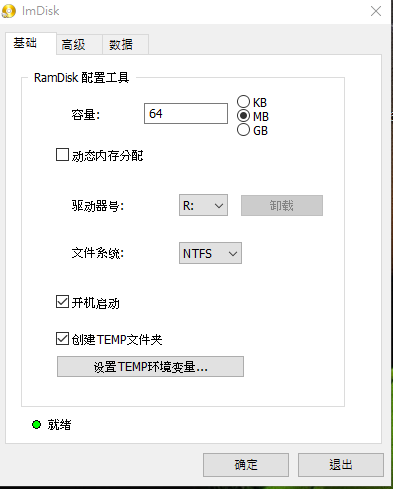
ImDisk在創建物理內存/虛擬內存重疊還是很容易的,加載ISO副本也沒有問題,如果你想把數據放在內存裡,那還是要折騰一下的。
因為ImDisk虛擬的內存硬盤重新啟動後就會消失,所以就需要批處理來自動解決這個問題,大致思路是讓ImDisk自啟動並加載虛擬磁盤,如果是存放臨
時數據,那麼關機的時候就不用管 了,因為數據不要了。
先去下載 imdisk URL = https://sourceforge.net/projects/imdisk-toolkit/

製作 Ram driver
可以掛載 ISO , Virtual HD , Virtual floppy 等等….


OrangePi 另類玩法
OrangePi 除了可以用來當 Linux Server , Media Player , 懷舊遊戲機之外 ….. !
還可以用 python / C 寫一些程式用來控制 OrangePi 的 GPIO , 類似單片機 MCU
今次我分享自己用 python 寫的小程式 , 用 GPIO 來控制 8X8 LED 點陣光亮 ,把當前的時間, 星期用二進制方式顯示出來
例如 : 時間 16:35:42 我們用八組 2 進制來顯示
小時 16 , 分開十位及個位 即是1 &6 十位 1 二進是 0001個位 6 二進是0110
分鐘 35 , 分開十位及個位 即是3 &5 十位 1 二進是 0011個位 5 二進是0101
秒 49 , 分開十位及個位 即是 4& 9 十位 1二進是 0100個位 9 二進是 1001
星期 3 , 個位即是 3 個位3 二進是 0011
我用4 行代表二進制的4個位 , 用 7 列分別代表 [時(2列) 分(2列) 秒(2列) 星期(1列)]
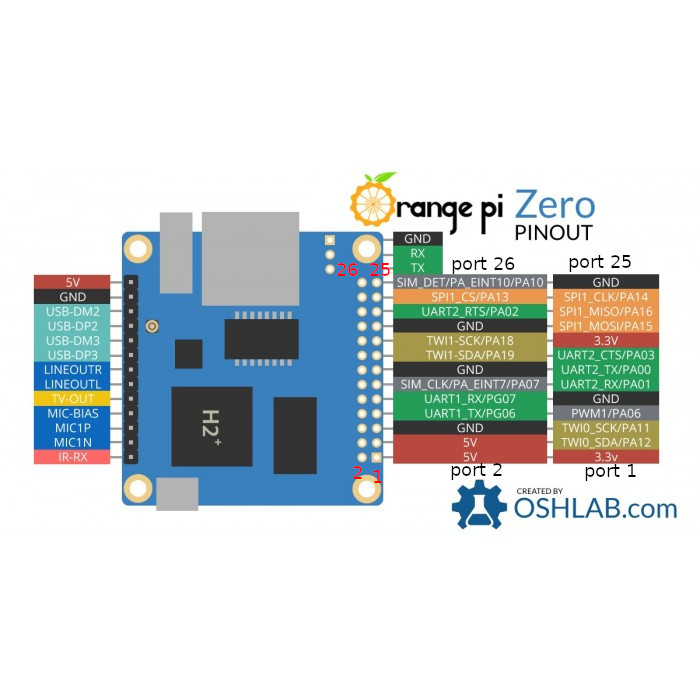
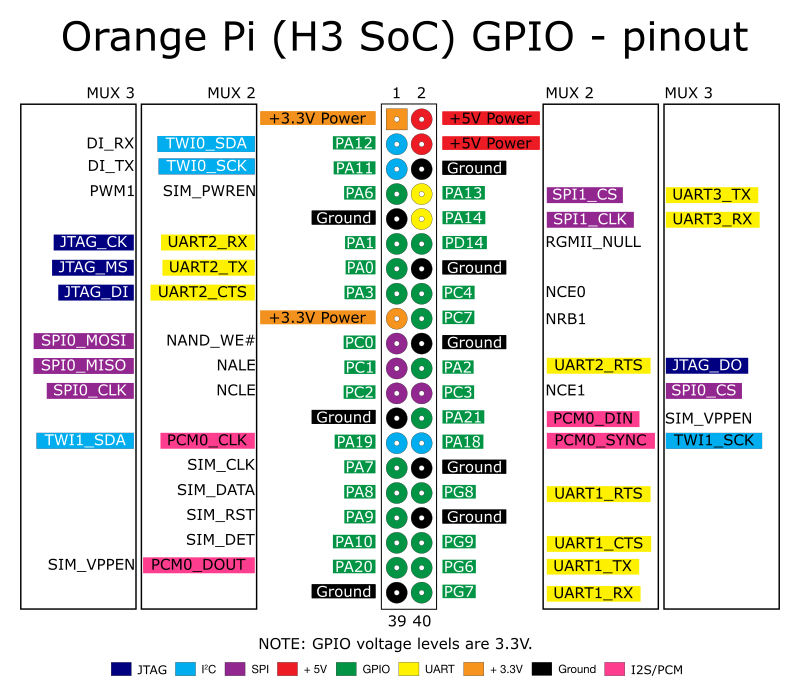
大家可以看看以下的圖片, H2 及 H3 CPU GPIO 分佈圖,
我替供的程式碼是以 H3 GPIO 寫, 如果用 H2 CPU 的朋友要自己再更改 PORT 對應了
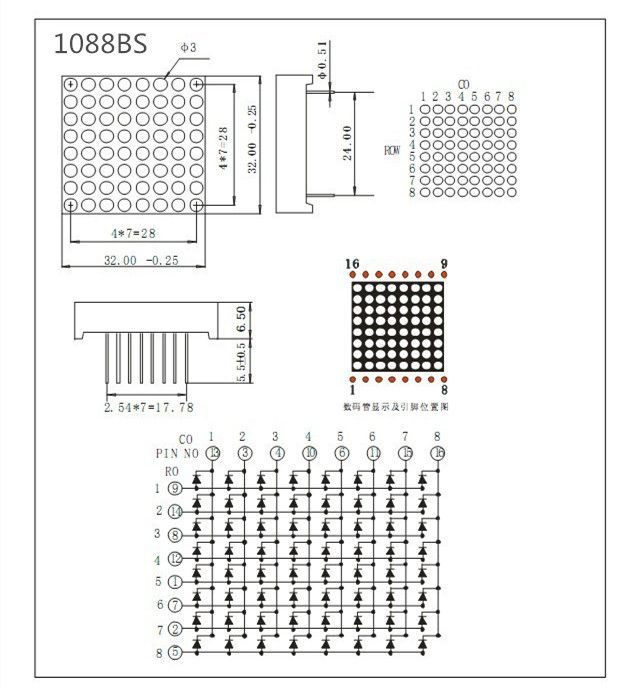
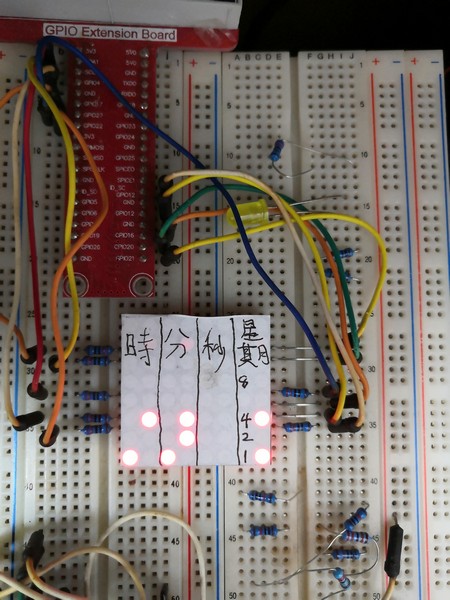
再來大家了解一下 8X8 LED 點陣 , 我用的是 1088BS 共陽點陣
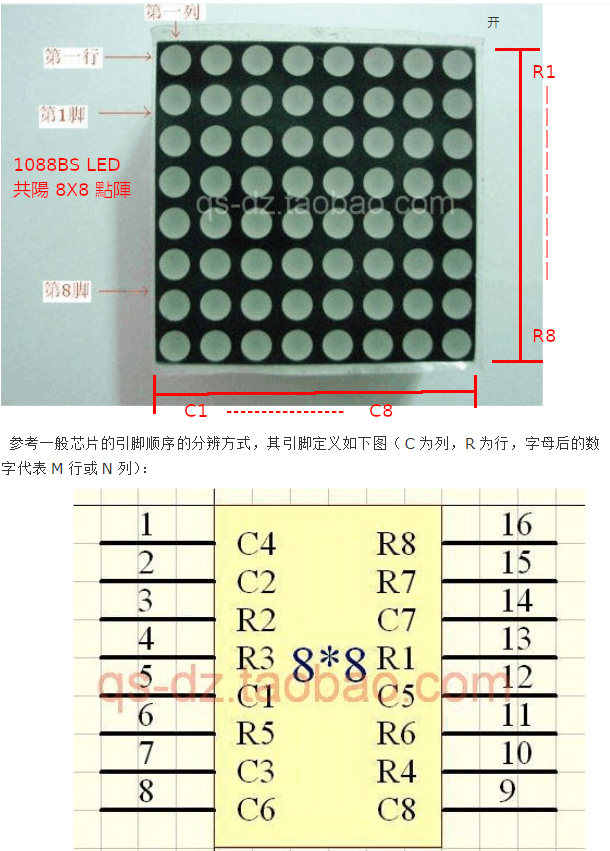
大家可能會發現上圖和下圖描述的 “行” 及 “列” 有所不同 ? 上圖是我使用麵包條所以1088BS 插腳是由左至右方式插 , 下圖插腳是由下至上方式插 , 整塊1088BS 轉了90度 , “行” “列” 會互換了 , 如果你們是左右就參考上圖 , 上下的就參考下圖了 .
上圖是 “行””R” 為接地 , “列””C” 為正極 , 最好在正極接上一個1k電阻保護LED , 那麼下圖就是 “行””R” 為正極了 , “列””C” 接地
現在 OrangePi 要安裝 GPIO 資料庫 , 我用這個 pyH3 Python Library
https://www.instructables.com/id/Orange-Pi-One-Python-GPIO-basic/
還有很多 Library 用的 , 其他參考 !
https://pypi.org/project/OrangePi.GPIO/
當然引用時有不同的呼叫方法 !
以下是我寫的程序 , 不是寫得好好, 應該可以用 CALL FUNCTION 的方式去處理十個及個位轉二進制的 !
以後再修改一下
下載程式碼
稍為改良用了 call function 的程式碼
如果把 FILE 改為可執行檔
chmod +x bin2clock.py
./bin2clock.py
應該會發現如下圖 : 顯示時間是 14點15分43秒 星期五
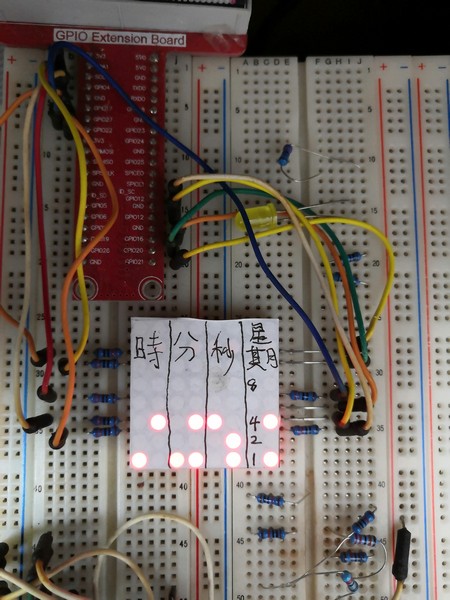
顯示時間是 14點16分00秒 星期五
你們看見有7個1K電阻, 因為正極要拉一個電阻才能保護 LED 燈, 你們看見我寫了
1248 那一列是我弄燒了那列 LED 所以星期用了第八列做 , 同樣第四行都是燒了 所以跳過了
其餘那4個沒有電阻用釘書釘連接是陰極所以不用電阻 !
OrangePi 當懷舊遊戲機
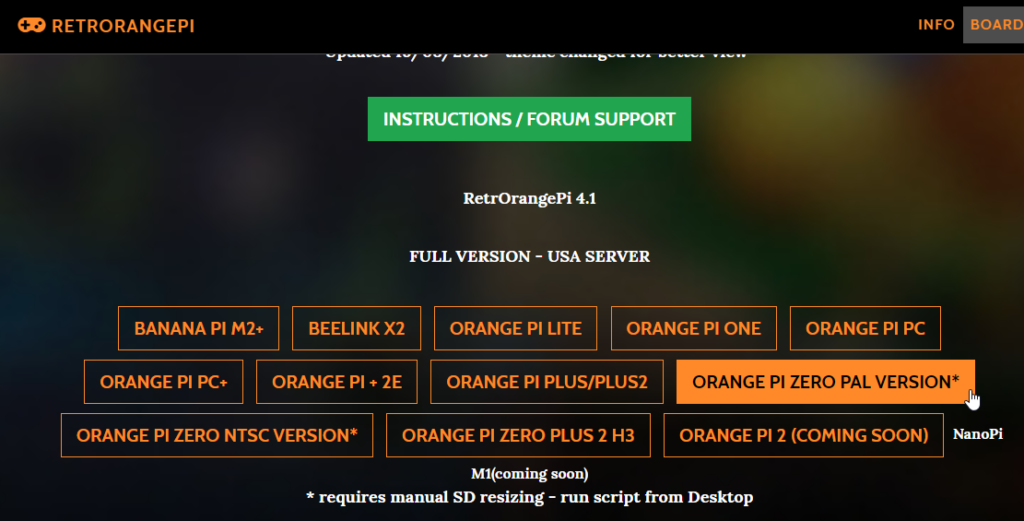
先下載 OS 影像檔 URL http://www.retrorangepi.org/
找你自己所買的 OrangePi 型號
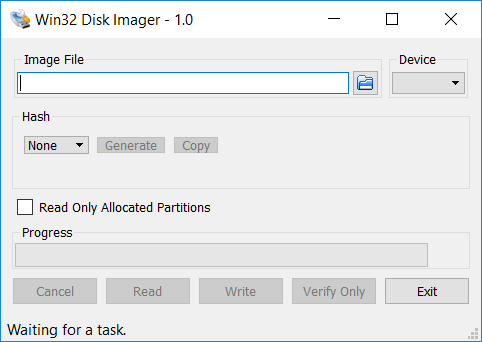
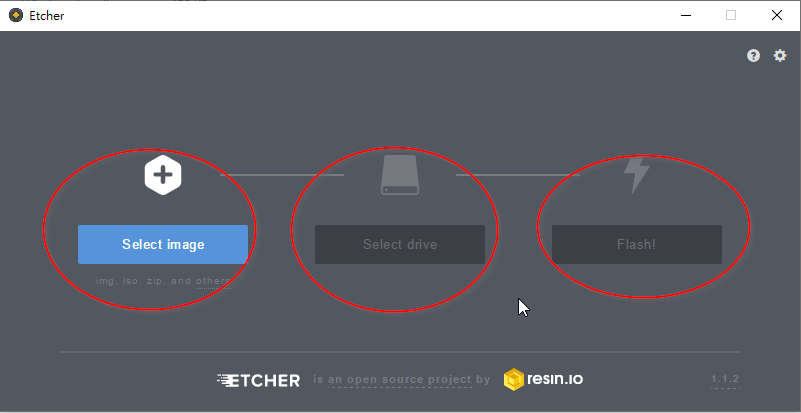
之後要下載寫入軟件
用來把 OS IMAGE 寫入 SD CARD 內 Balena
Etcher 或 Win32diskmanger

完成後把 SD CARD 插入 ORANGEPI 內開機
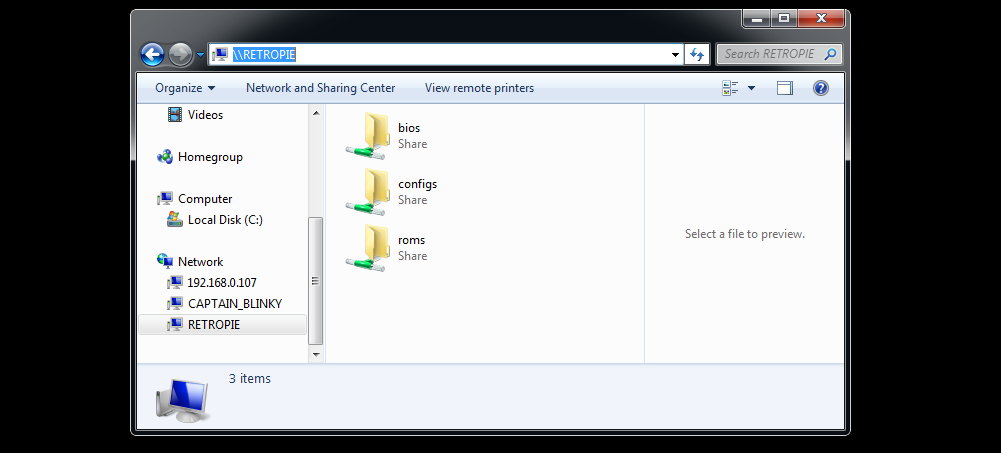
記得要插 NETWORK 因為要從 WINDOWS 電腦把 GAME ROM COPY 入去 RETRORANGPI 內
在WINDOWS NETWORK 找找有沒有 RETRORANGE 或者知道 IP 就在檔案總管 \\192.X.X.X
raspberry pi 好多人都聽過 orangepi 又幾多人聽過呢?
orangepi 相對價錢比 raspberrypi 平 , 當然RAM & CPU
是有分別的 !
orangepi 用來做簡單的 SERVER 都很有趣 , 用來學習成本相對底 !
我本人就用來學習 Linux 之用
我自己用了 orangepi zero 做了一個 WEB SERVER 用來做 Traffic Report Server
軟件是 CACTI

參考 CACTI 安裝方法 URL : https://computingforgeeks.com/how-to-install-and-configure-cacti-on-ubuntu-18-04/
如果你有 SWITCH 是有 SNMP 的那就可以用來產生 SNMP LOG , 用 CACTI 分柝
如果沒有那種 SWITCH 都不要緊可以用 orangepi 本機 LAN CARD 產生 SNMP 分柝
準備的軟硬件
1. orangepi zero ( 沒有
HDMI , VGA 輸出, 有買擴展板有 AV
輸出[即是黃白紅三色線] ) 或都用 USB DATA CABLE 即是可以傳數據的那種(可以用電腦連接時做個
serial port 來做 console ), 有些只供電的 USB CABLE 不會有 serial port 的
2. macro sd card (
用來裝 OS 用 )
3. FT232RL/PL2303HX
USB转串口线 (這個是可選的, 不一定要 ) 因為我不想駁AV線及不想老是駁電腦供電所以分開供電同console , 所以用TTL CABLE 做 serial port console !
這三樣東西都是淘寶網購的 !
首先下載 OS , 我用的是 ARMBIAN LINUX FOR ORANGEPI ZERO

之後要下載寫入軟件 ( 用來把OS IMAGE 寫入 SD CARD 內)
軟件 Balena Etcher
裝了 OS 的 SD CARD 準備好了 , 如果你是用 AV 線就駁好電視 , keyborad ,mouse
如果用 TTL 的先把 USB TTL CABLE 連接 ORANGEPI ZERO 了
參考網址
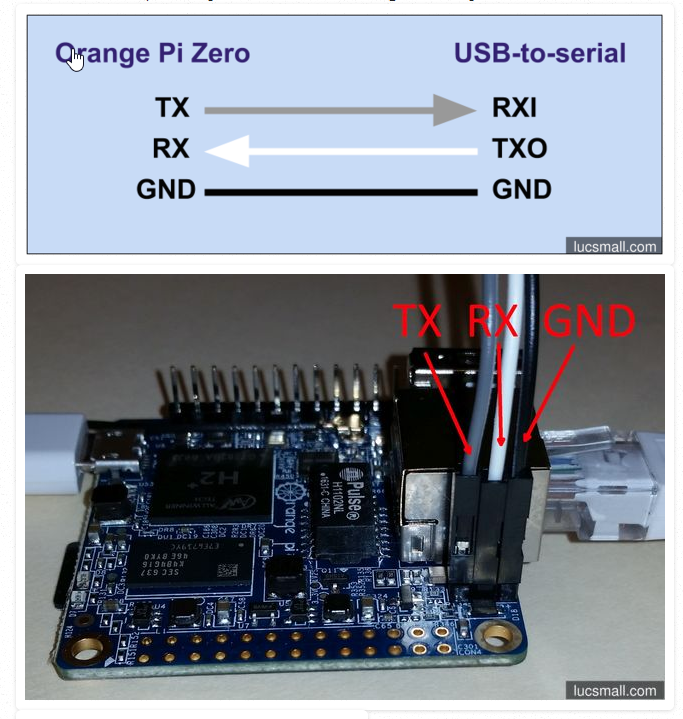
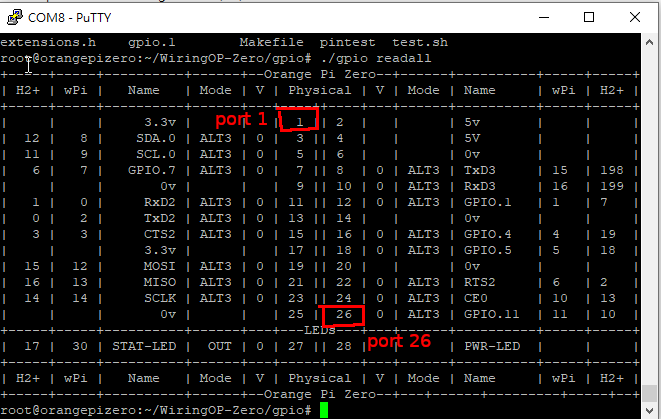
準備你的電腦, 插入TTL USB
CABLE 看看是什麼COM PORT

我的是 COM6 , COM8 是電腦 USB 供電給 ORANGEPI 時同可以做 CONSOLE 的, 兩個都可以連上 ORANGEPI
用 PUTTY 或 TeraTerm 連接 COM PORT , SPEED 選115200

就會出現 LOGIN 畫面了

login
name :root , default password : 1234
記得一定要改 PASSWORD 呀 !
之後的你們懂的 , 裝上 APCHE2, PHP , MYSQL
, SNMP , CACTI 就是了
! 因為 ARMBIAN 是 BASE DEBIAN 的裝軟件用 APT
例如: apt install apache2
自由發揮就是 LINUX 好玩的地方