之前已完成的文件 , 又要重新寫一次 , 事因 VPS 供應商的問題 , 導致所有資料盡失
開始了! 首先你要確定你的 VPS 最少有 2GB RAM 才能有足夠的 RAM DISK 作為安裝 Arch Linux 的 temp root file system。
你的 VPS 安裝好 Debain 系統先 , 因為接下來用 Grml 軟件才能作為 arch linux 安裝的引導 , 詳情可瀏覽
在 debian console shell 安裝 grml-rescueboot
apt -y update
apt -y install grml-rescueboot
Download grml iso 鏡像檔
# 可以使用如下命令自動下載最新的 grml iso, 但只能 download full 版本的 iso
update-grml-rescueboot

# 以我的經驗如果RAM 只有 2GB Ram, 最好用 small 版本的 iso 成功率高很多 , 可以瀏覽 https://download.grml.org
cd /boot/grml
wget https://mirror-hk.koddos.net/grml/grml-small-2025.12-amd64.iso
請先自己記下當前 debain 的網絡訊息 , 用以下 command
ip address   # 查看現時的 IP 及 netmask
ip route     # 查看現時的 default route ip address
Edit 設定檔 , 這個設定檔是 grml 引導的設定包括暫時 ssh password 等信息.
vi /etc/default/grml-rescueboot

CUSTOM_BOOTOPTIONS="ssh=password lang=us keyboard=us tz=Asia/Hong_Kong ip=192.168.1.50::192.168.1.1:255.255.255.0:grmlhost:ens3:none dns=8.8.8.8,8.8.4.4 toram"

#其中:
#192.168.1.50 → 客戶端 IP
#:: → 省略 NFS server IP(非必填)
#192.168.1.1 → Gateway
#255.255.255.0 → Netmask
#grmlhost → 主機名稱
#ens3 → 網卡名稱
#none → 不使用自動設定(如 DHCP)

#如果你用 DHCP 的設定
CUSTOM_BOOTOPTIONS="ssh=password lang=us keyboard=us tz=Asia/Hong_Kong toram"
如果你有其他設定需求可以參考以下網頁 grml-rescueboot
更新 GRUB BOOT 配置
#先新增 /usr/sbin/ 目錄入 PATH 裏面
export PATH=$PATH:/usr/sbin/

#之後執行
update-grub
更新 grub 記錄, 使下一次啟動時引導到 arch linux 安裝步驟
# 使用 full iso 的使用如下命令
grub-reboot "Grml Rescue System (grml-full_20xx.xx.iso)"
# 使用 small iso 的使用如下命令
grub-reboot "Grml Rescue System (grml-small_20xx.xx.iso)"
reboot 系統進入 arch linux 安裝程序
sync
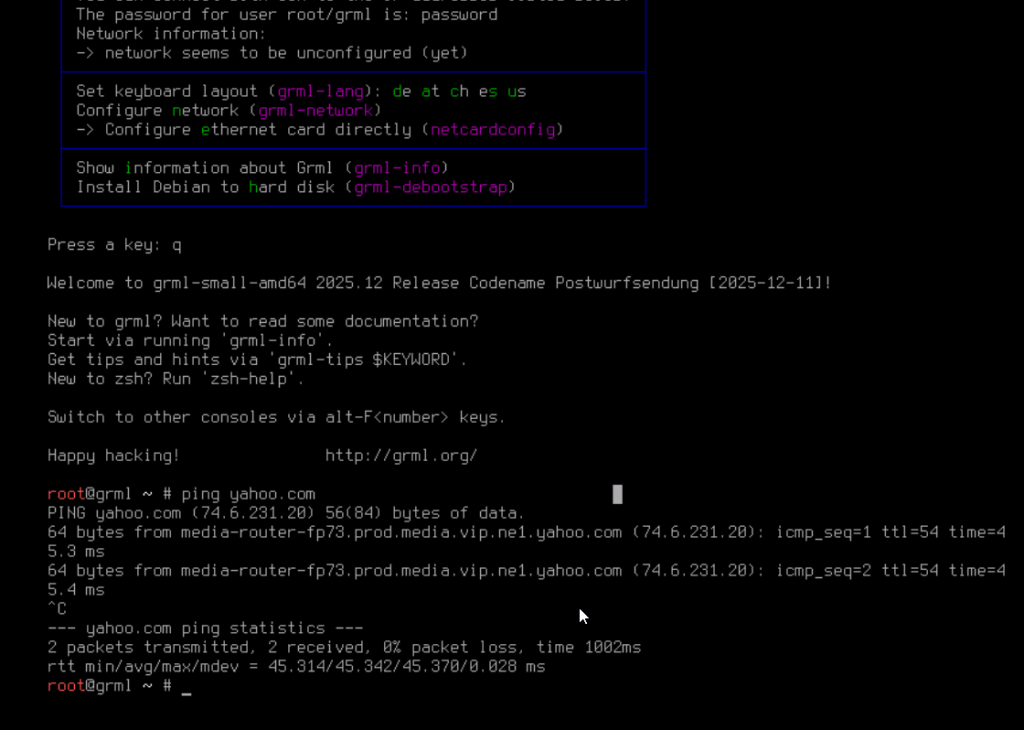
reboot用 VPS 提供的 VNC CONSOLE 可以看到 BOOT 機情況 , 如果上唔到網可以在這個畫面按下 “e” 就可以手動輸入之前你寫下的網絡訊息 !
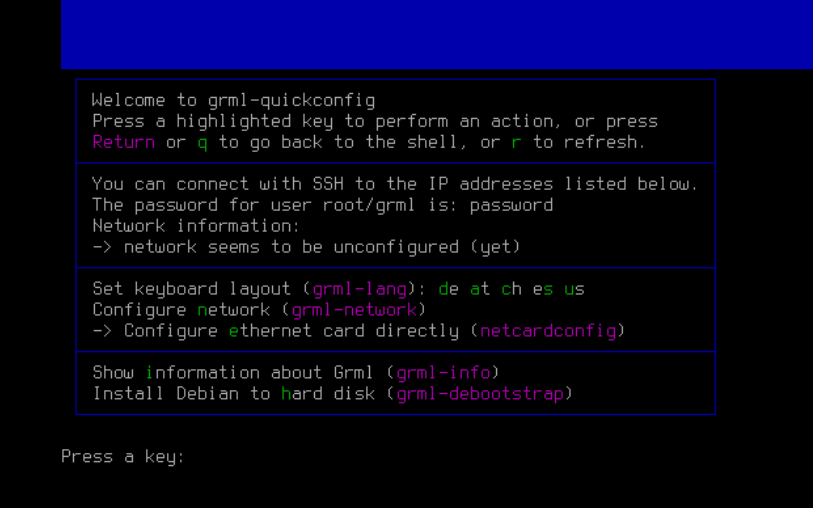
設定完成可以試一試 ping 看看有沒有回應
Arch Linux 安裝
以上步驟是在 grml live 引導內進步 , ram disk 有限, 下載完 arch linux base root system 後把 zip 檔 delete
cd /tmp
wget https://geo.mirror.pkgbuild.com/iso/latest/archlinux-bootstrap-x86_64.tar.zst

# 解壓 ZST
tar --use-compress-program=unzstd -xvf archlinux-bootstrap-x86_64.tar.zst

# delete ZST file 增加 ram disk 空間
rm archlinux-bootstrap-x86_64.tar.zst
選擇你地區的 source list , 例如 : Hong Kong 當然你可以選擇其他地區, 但可能 update 時會比自己地區 server 慢
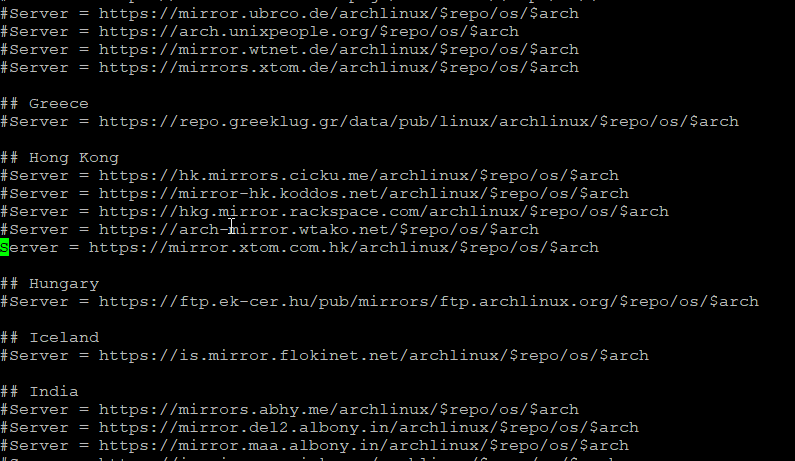
vi /tmp/root.x86_64/etc/pacman.d/mirrorlist

## Hong Kong
#Server = https://hk.mirrors.cicku.me/archlinux/$repo/os/$arch
#Server = https://mirror-hk.koddos.net/archlinux/$repo/os/$arch
#Server = https://hkg.mirror.rackspace.com/archlinux/$repo/os/$arch
#Server = https://arch-mirror.wtako.net/$repo/os/$arch
Server = https://mirror.xtom.com.hk/archlinux/$repo/os/$arch
避免 chroot 後提示硬碟空間不足
mount --bind root.x86_64 root.x86_64chroot 修改 arch linux root file system
/tmp/root.x86_64/bin/arch-chroot /tmp/root.x86_64/以下操作是在 chroot arch linux root system 內進行
#初始化 pacman 軟件包管理器 key

pacman-key --init
pacman-key --populate archlinux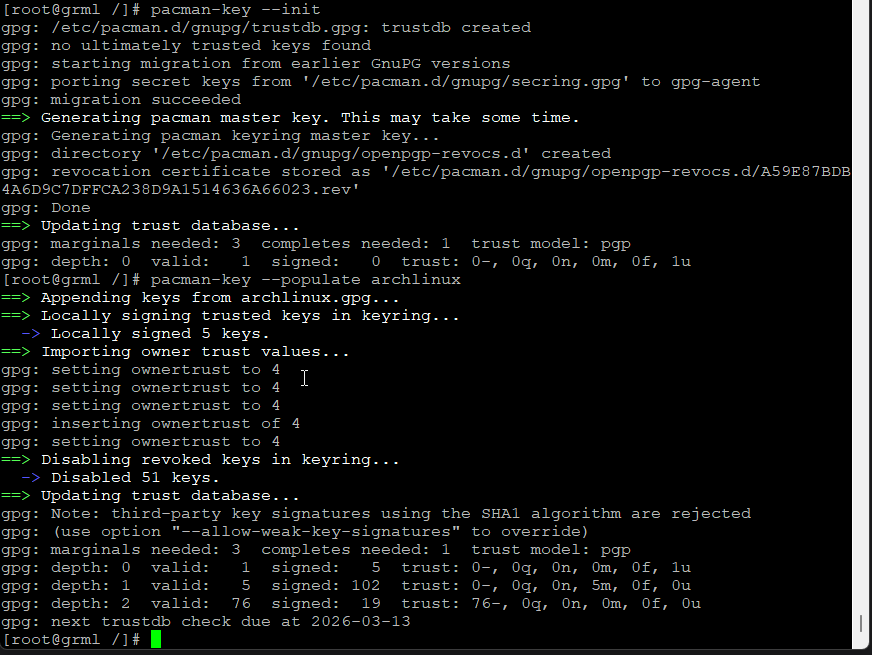
更新系统並安裝分區需要用到的工具
pacman -Syyu                 # 更新軟件包管理器的軟件
pacman -S dosfstools parted  # 安裝劃分分區軟件
磁碟分區
# 首先將硬盤轉換為 gpt 類型.
lsblk # 顯示分區情况 找到你想安装的硬盤名
parted /dev/vda # run "parted", 進入交互式命令行,進行硬盤類型轉換 ( vda 是我的HD , 如果你的是 sda 或 hda )
(parted)mktable # 輸入 mktable
New disk label type? gpt # 輸入 gpt 將類型轉換為 gpt 如硬盤有數據警告, 輸入 yes 即可
quit # 最後 quit 退出 parted 命令行交互
cfdisk /dev/vda # 執行分區操作, 分配各個分區大小及類型
# bios 引導需要分區 BIOS boot, Linux Swap, Linux filesystem
# uefi 引導需要分區 EFI System, Linux Swap, Linux filesystem
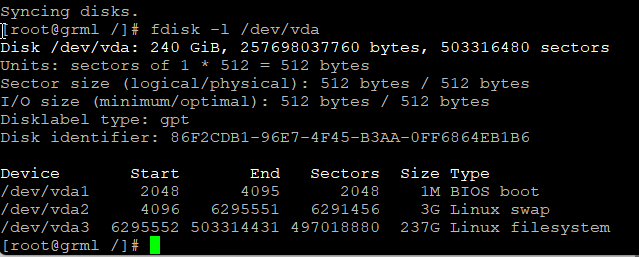
fdisk -l # 分區結束後, 檢查硬碟分區情况分成 1MB BIOS Boot , 3GB linux swap (大約是你的 RAM 1.5倍左右, 如果空間有限可以set細過 RAM 都可以 , 其餘全部做 root ( 當然你可以分開獨立 home folder 另一個分區 )
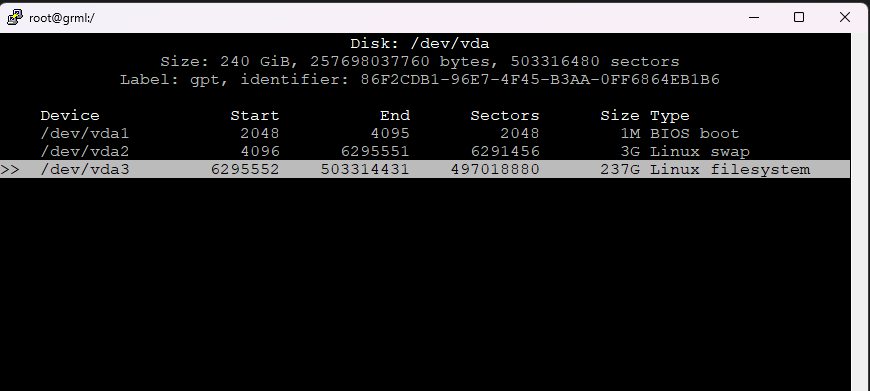
如果用 BIOS boot , 用以下 command format ( 多數 VPS 都是用這個 )
mkfs.ext4  /dev/vda3            # format root
mkswap /dev/vda2		# 初始化 swap 分區
mount /dev/vda3 /mnt	        # mount root 分區到臨時系統
swapon /dev/vda2		# enable swap
如果用 uefi boot , 用以下 command format
mkfs.ext4  /dev/vda3            # format root
mkfs.vfat  /dev/vda1            # 格式化 uefi 分區, 僅 uefi 引導需要
mkswap /dev/vda2		# 初始化 swap 分區
mount /dev/vda3 /mnt	        # mount root 分區到臨時系統
swapon /dev/vda2		# enable swap
mount --mkdir /dev/vda1 /mnt/efi   # mount uefi 分區
安裝基本軟件包
pacstrap /mnt base base-devel linux linux-headers linux-firmware dhcpcd iwd vim bash-completion grub openssh
生成 fstab 配置文件
genfstab -U /mnt >> /mnt/etc/fstabrun exit 退出 chroot 環境
重新 chroot 到剛剛做好的基本 root file system
/tmp/root.x86_64/bin/arch-chroot /tmp/root.x86_64/mnt出現這訊息不用理會

設定 time zone
ln -sf /usr/share/zoneinfo/Asia/Hong_Kong /etc/localtime
hwclock --systohc
systemctl enable systemd-timesyncd.service
配置語言環境, 選擇 en_HK.UTF-8 UTF-8 及 zh_HK.UTF-8 UTF-8 ( 如果你有需要可以選擇你喜歡的語言環境)
vim /etc/locale.gen生成 locale
locale-gen向 /etc/locale.conf 導入内容
echo 'LANG=en_HK.UTF-8' > /etc/locale.conf設定 host name
# 加入你想為 server 命名, 例如: ArchLinux
vim /etc/hostname

# 同時在 /etc/hosts 設定與其匹配
vim /etc/hosts

# 加入如下内容
127.0.0.1   localhost
::1         localhost
127.0.1.1   ArchLinux
設定網絡
vim /etc/systemd/network/20-wired.network內容如下:
[Match]
Name=eth0

[Network]
Address=xx.xx.xx.xx/24 # ipv4 地址

#如果沒有 ipv6 不用加以
Address=xxx:xxx:xxx:xxx:xxx:xxx:xxx:xxx/80 # ipv6 地址
IPv6AcceptRA=no

[Route]
Gateway=x.xx.xx.1
GatewayOnLink=yes

# 如果沒有 ipv6 route 不用加以下內容
[Route]
Gateway=xxx:xxx:xxx::1/80
GatewayOnLink=ye
如果網絡支持dhcp, systemd-networkd的 dhcp 配置可如下配置
[Match]
Name=eth0

[Network]
DHCP=yes
設置 systemd-networkd 及 sshd 開機自動執行
systemctl enable systemd-networkd
systemctl enable sshd
配置 dns
vim /etc/resolv.conf

nameserver 8.8.8.8
nameserver 8.8.4.4
setup root password
passwd root安装 grub
pacman -S grub
# 對於 bios 引導的機器請使用下面的命令, 注意是安裝 grub 到硬碟而不是某一個分區

# bios boot
grub-install --target=i386-pc /dev/vda

# uefi only #
# 如果使用 uefi 引導, 則還需要安裝 efibootmgr
pacman -S efibootmgr
# 然後使用下面的命令安裝 grub
grub-install --target=x86_64-efi --efi-directory=/efi --bootloader-id=GRUB
# end uefi only #

# 編輯配置文件, 去掉 GRUB_CMDLINE_LINUX_DEFAULT 參數的 quit
# 添加 net.ifnames=0(避免機器重啟後, 網卡接口名無法與 systemd-networkd 內配置的接口名相匹配, 從而導致機器失聯)
# 添加 nowatchdog(提高開關機速度), 把 log level 的數值從 3 改成 5(出現系統錯誤方便排錯)
vim /etc/default/grub
# 生成 GRUB 所需的配置文件
grub-mkconfig -o /boot/grub/grub.cfg
退出 chroot 環境及reboot
exit
reboot